The 3 lights on your Hype MiC serve as a multifunctional information display - the diagram below, taken from the Hype MiC User Guide, explores these different functions:
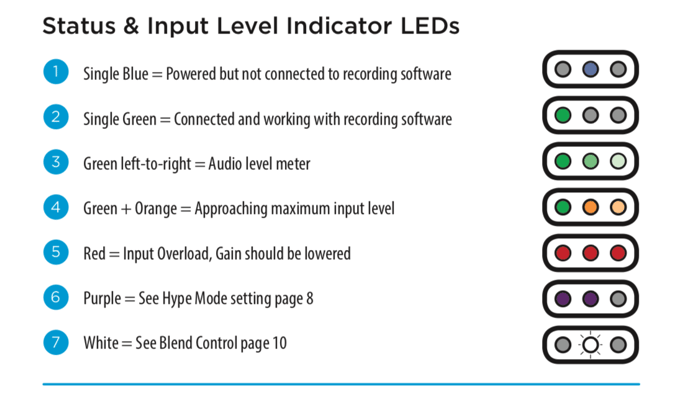
Single Blue Light:
Upon plugging your Hype MiC into a device, you will likely be greeted by a single blue light. This indicates that the microphone is receiving power, but is not actively being used as an audio input in your choice of recording/streaming/telecom software.
Single Green Light:
Once communication between your Hype MiC and your software is established, a single green light will come on, replacing the blue light.
This indicates a happy, healthy, connection; your mic is ready to go!
Green Lights, Left to Right:
Now that we have connected your microphone to your software, the indicator array will function as an easy-to-read meter, letting you know the relative gain level of your input signal.
The meter lights from left to right, illuminating more lights the more input gain is present.
Single Green & Two Orange Lights:
This is a continuation of the above; once you surpass the level shown by 3 green lights, the rightmost 2 lights will turn orange. This indicates that you are approaching clipping (distortion) and should consider turning down your input gain, or adjusting your source volume.
Think of this as a yellow light - slow down!
Red Lights:
3 red lights is a signal that the input gain is clipping (distorting.) As a result, your recorded/streamed audio will be distorted. To fix this, adjust your input gain with the knob, or lower your source volume.
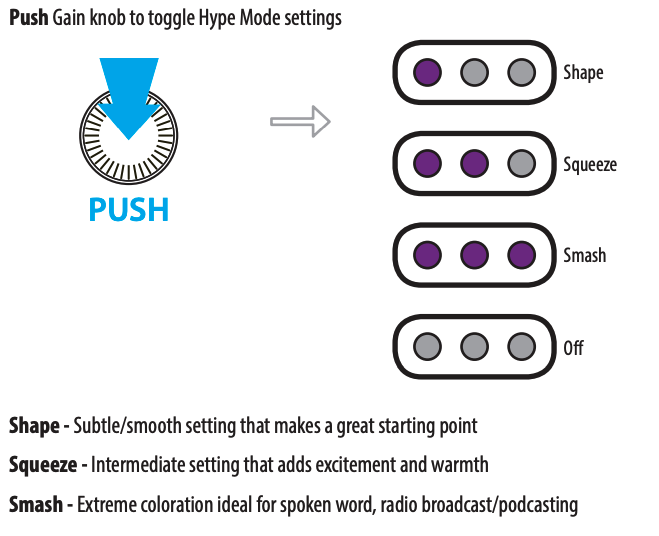
Purple Lights:
By tapping the main encoder knob on your Hype MiC, you are activating Hype Mode, aka the onboard compression circuit.
The purple lights indicate the intensity of the compression being applied; 1 light being the lightest, and 3 being the most. The diagram below, taken again from the Hype MiC User Guide, explains common applications of these different modes:
White Lights:
Your Hype MiC has a few different monitoring, or Blend, configurations (ie, how you hear the signal.) These different configs are shown with the white lights; you can cycle through them by clicking the Blend button:

The diagram below, taken again from the Hype MiC User Guide, (last one I promise!) explains the mix differences of these blend modes:
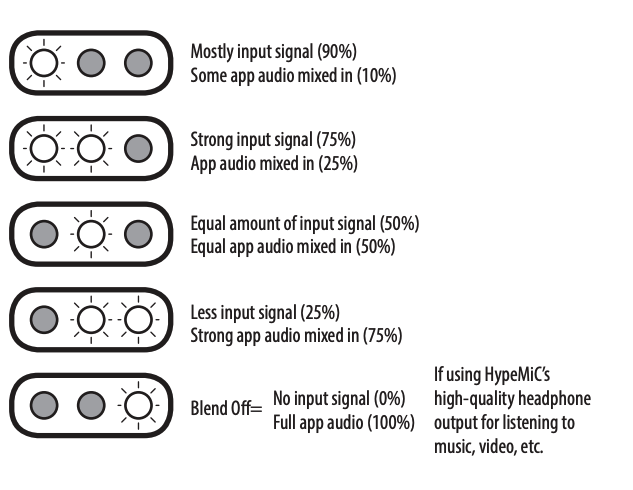
Please Note: when the diagram cites "Input Signal" it is referring to the unprocessed signal being picked up by your mic, NOT the signal that you have previously Input and Recorded into your DAW.
This blend mode is often the culprit of not being able to hear anything from the mic. ALWAYS cycle through these if you're encountering any output issues!