- Knowledge Base
- Legacy Products
- Symphony I/O Mk 1
-
BOOM
-
Duet 3
-
Symphony Desktop
-
Symphony I/O Mk 2
-
Jam X
-
HypeMiC
-
MiC +
-
ClipMic digital 2
-
Groove
-
Jam +
-
MetaRecorder
-
Plugins
-
Apogee Control Remote
-
FAQ
-
Legacy Products
- AD-16x & DA-16x
- AD-16 & DA-16 (non-x versions)
- AD-8000
- AMBEO Smart Headset
- AMBus Cards
- Big Ben
- Duet (Firewire)
- Duet 2
- Duet for iPad/Mac/PC (USB)
- Avid Pro Tools Duet
- Element Series
- Ensemble (Firewire)
- Ensemble (Thunderbolt)
- GiO
- Jam
- Maestro App
- Maestro 2
- MiC
- MINI Products
- One
- One (iPad, Mac, PC)
- PSX-100
- Quartet
- Rosetta 200
- Rosetta 800
- Rosetta AD
- Sennheiser ClipMic
- Symphony32 PCI Cards
- Symphony 64 PCIe & Thunderbridge
- Symphony I/O Mk 1
- Symphony Mobile
- Trak2
- X-Digi-Mix
- X-FireWire
- X-HD
- X-Symphony
- X-Video
-
First Take
How to set the Symphony I/O Mk I to auto power on
To configure Symphony I/O Mk I to power on as soon as AC power is present on the rear panel AC input follow these steps:
1. Disconnect Symphony I/O’s AC input.
2. Remove the top cover as described in Installing I/O modules.
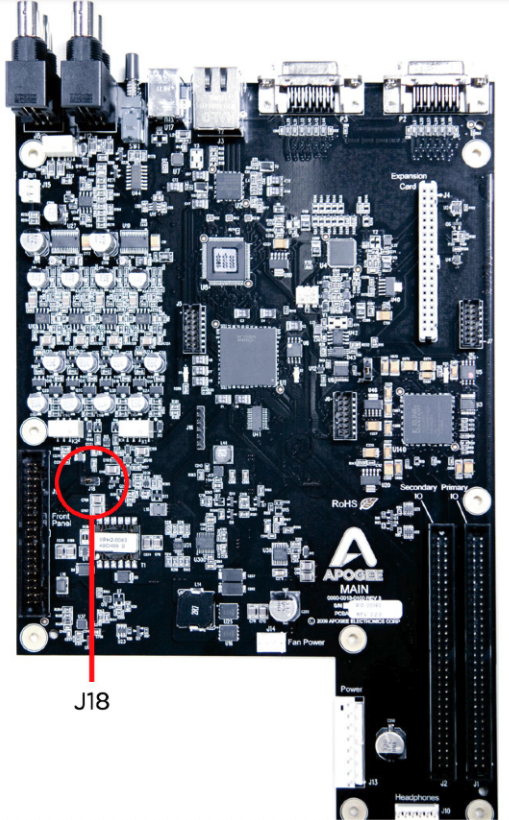
3. Place a jumper across pins J18 (whose location is indicated below).
4. Replace the top cover before applying AC power.
5. The front panel power switch remains operational.
Auto Power is useful in circumstances where an external power switch is used to power on multiple devices, such as a rack of Symphony I/Os with a master power switch.