To see any image in this tutorial more clearly, right-click it and choose Open Image in New Tab.
For videos, switch to Full Screen for the best view.
What is SPHERE?
SPHERE by Ginger Audio is a virtual monitoring controller, bass management, and room correction system for immersive speaker setups up to 9.1.6. It provides master volume, DIM, and per-speaker mute and solo controls, along with per-channel delay for precise time alignment.
Its comprehensive bass management supports up to four subwoofers, and you can insert any VST plugin on any channel for room correction or calibration.
Built on the flexibility of Apple Core Audio, Sphere seamlessly connects your hardware and software environments—and even supports Elgato Stream Deck integration for tactile control.
Ginger Audio offers a free 14 day trial of Sphere. https://www.gingeraudio.com/
Conceptually the routing works like this:

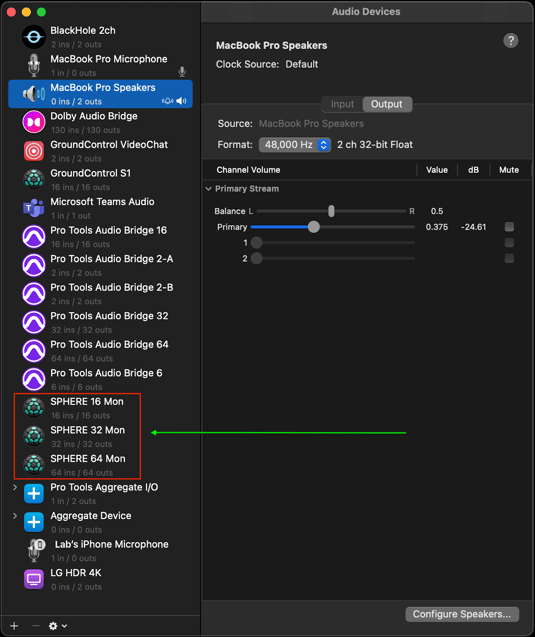
First install Sphere. Sphere includes 3 multichannel Core Audio busses one of which we’ll use to connect Pro Tools to Sphere and then Sphere to the Symphony I/O MkII. You can see them here in AudioMIDI setup.
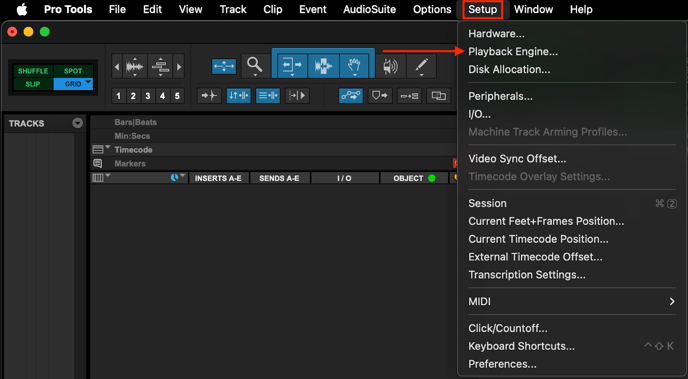
To keep things simple, we will build a new, very small Atmos Pro Tools session from scratch. In Pro tools, go to Setup> Playback Engine.
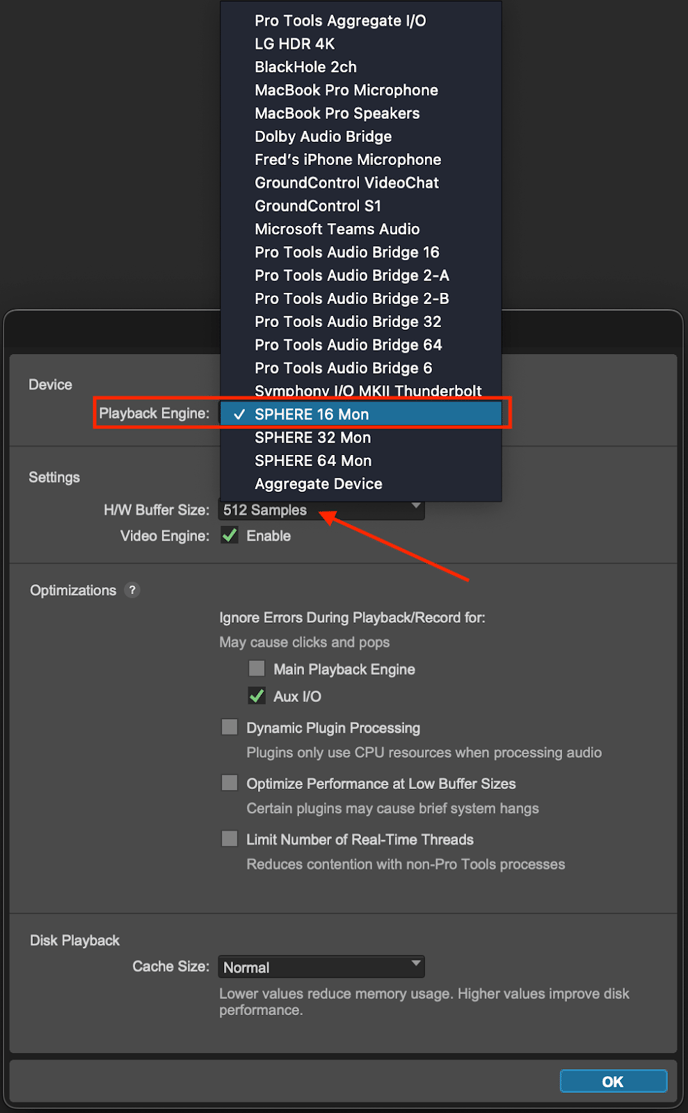
From the Playback Engine dropdown menu, select SPHERE 16 Mon.
Also set your H/W Buffer Size to at least 512 Samples which is the minimum required for the Atmos binaural (Headphone) renderer which we'll look at shortly.
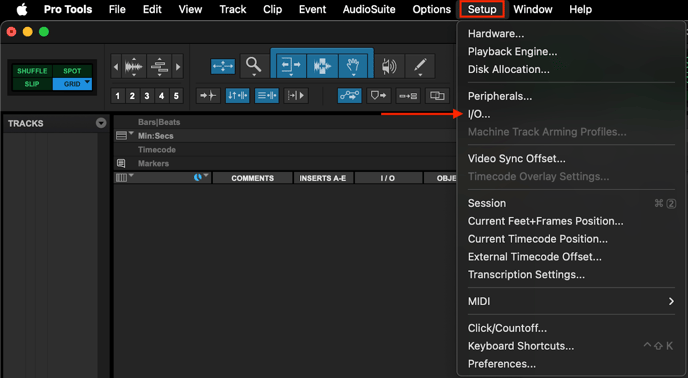
Next, open up the I/O Settings - Setup> I/O
It's recommended that you start from a blank slate for this exercise unless you are a Pro Tools I/O setup expert.
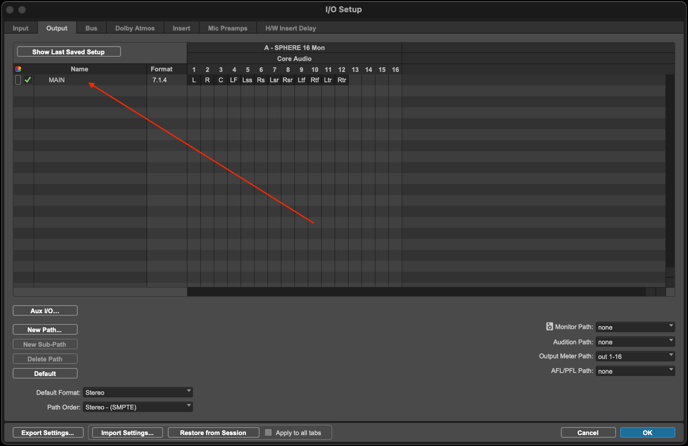
Click on New Path and from the New Paths dropdown, select 7.1.4
It will auto - populate the channel names.
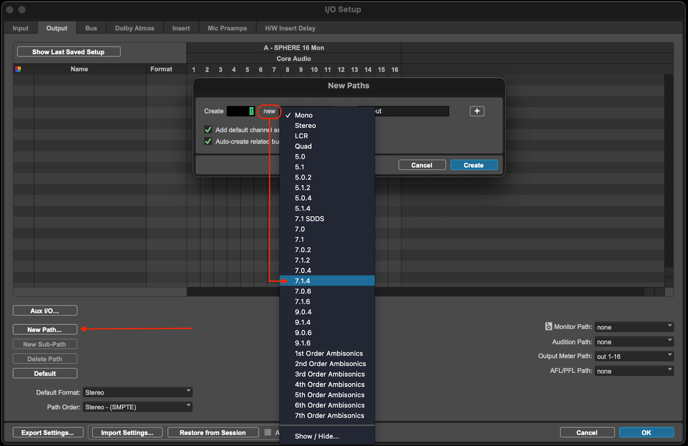 Name the new path MAIN or whatever you want, just not output.
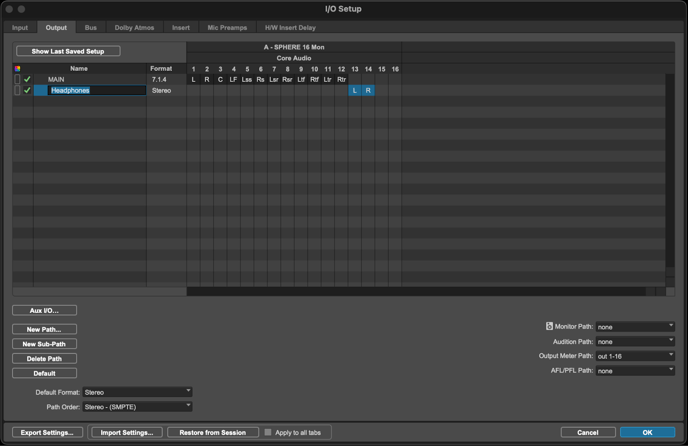
 Then create a Stereo path.

It will auto-populate the next two outputs 13 & 14.
Name it Headphones - more on this later.
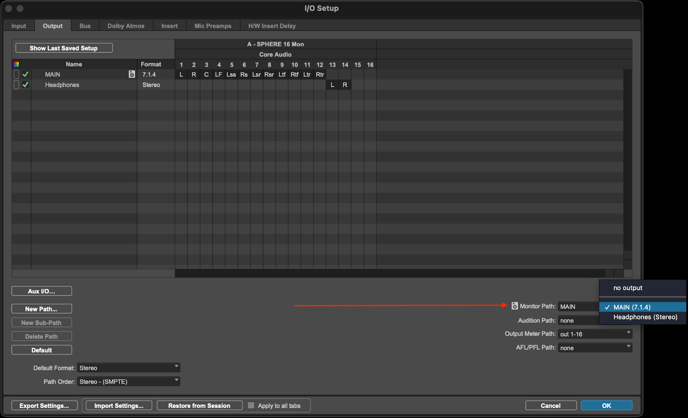
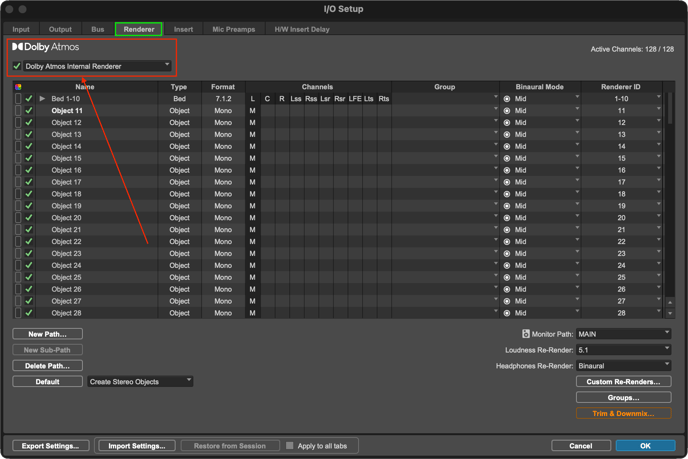
Then make sure the monitor path in ProTools I/O is set to “Main” 7.1.4..
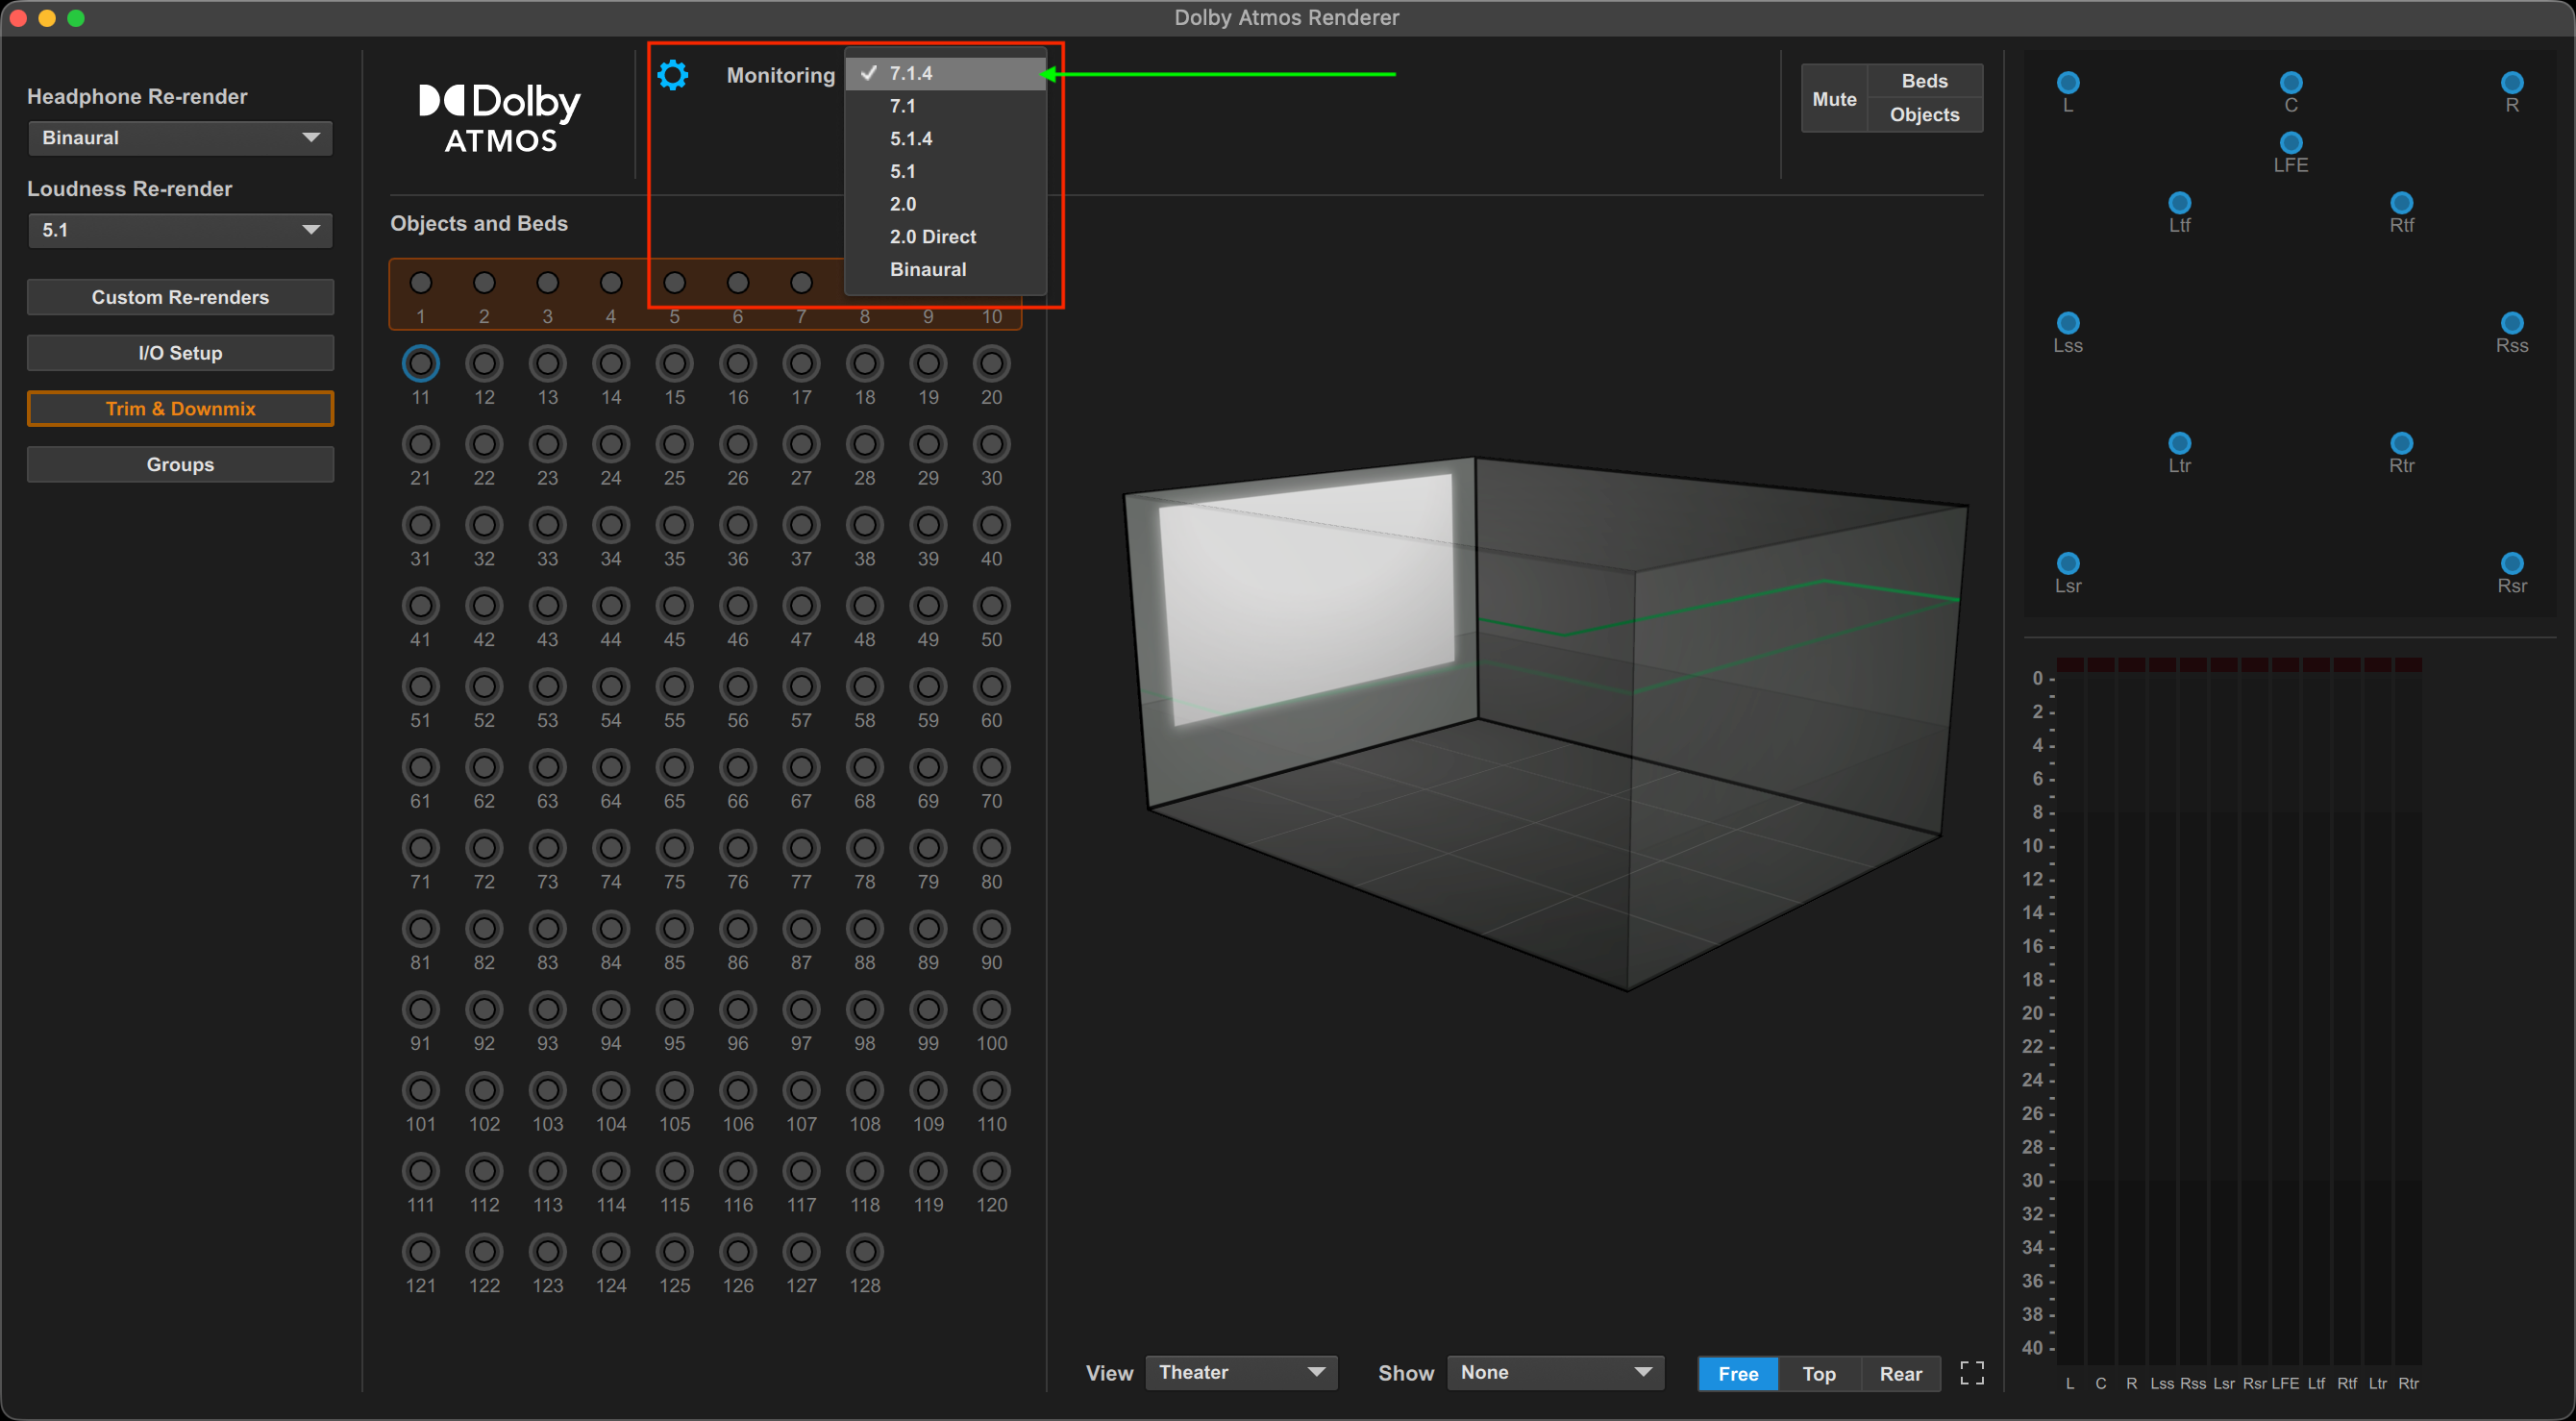
Finally, before closing the I/O window, make sure that the Dolby Atmos Internal Renderer is enabled. Select the Renderer tab and from the dropdown select Dolby Atmos Internal Renderer, put a check in the check box and click OK to close the window.
Back in the Edit window, make sure that you have "Objects" set to visible or ON in Edit Window Views.

In the Edit window create a mono track and make it an Object track by clicking on the "Bus" button.
Clicking on Bus (its default state) changes it to an Object.
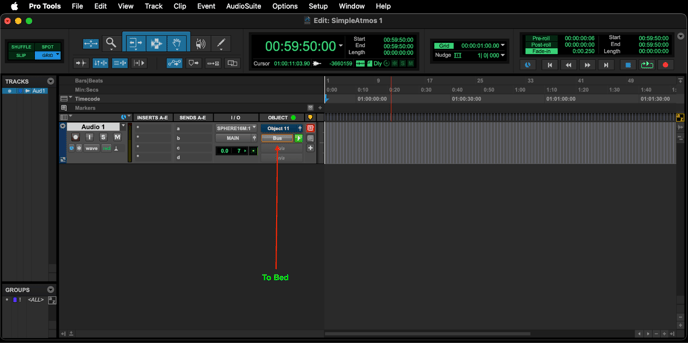
Now it’s an Object track. It defaults to the first available Object number, in this case 11.
We won’t get into Object versus Bed or why it defaults to 11 , this is just to get some sound flowing.
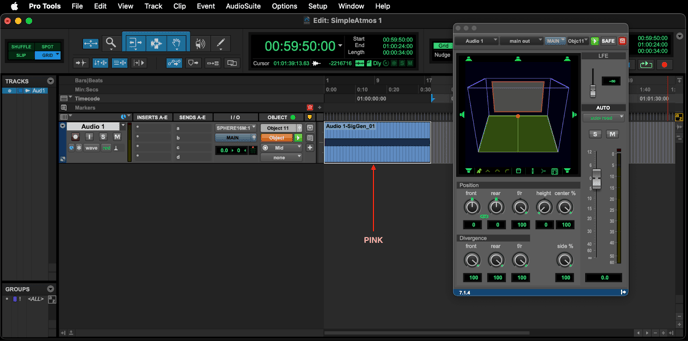
Like any other Pro Tools track, clicking on the little fader icon opens the channel fader and panner.
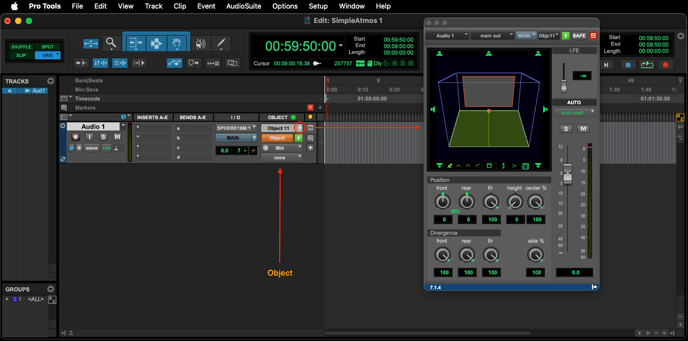
Next put some audio on this track - It could be a drum loop or pink noise, but keep it mono for the moment. Don't use a sine tone.
We’ll be panning this around to test the system.
Boot Sphere.
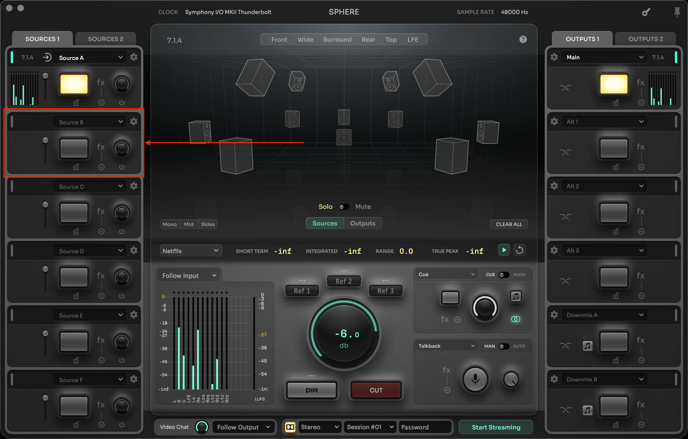
In Sphere, in the Source A dropdown select the source (input) which will be SPHERE 16 Mon (this is what will be coming from Pro Tools)
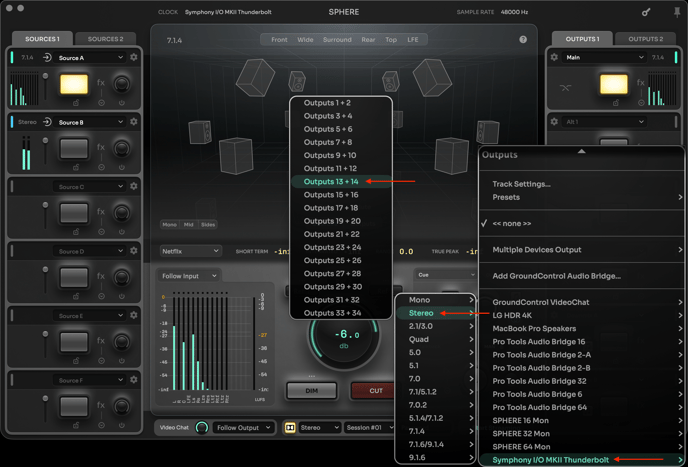
Next, in the output tab in the top right, click on the dropdown and select
Symphony I/O MKII Thunderbolt > 7.1.4 > L R C LFE Lss Rss Lrs Rrs Ltf Rtf Ltr Rtr.
At this point everything is connected - Pro Tools → Sphere → Symphony I/O MKII Thunderbolt.
Next, make sure that Pro Tools' Dolby Atmos Renderer Monitoring is set to 7.1.4.
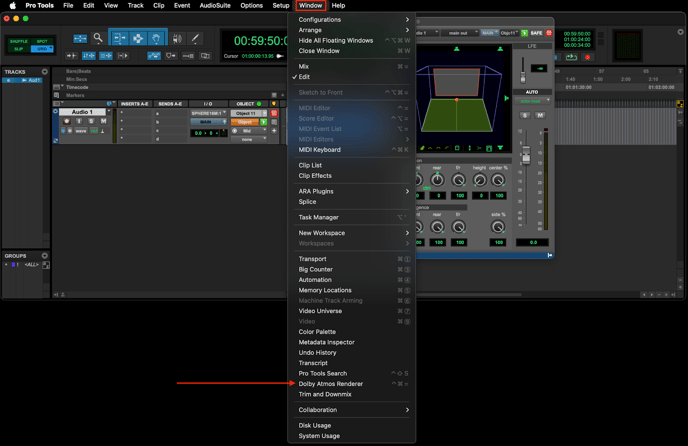
NOTE: As of Pro Tools version 2025.10.0, in the Window menu, the Dolby Atmos Renderer is just referred to as Renderer.
Here we see a simple Pro Tools Atmos session playing some test audio.
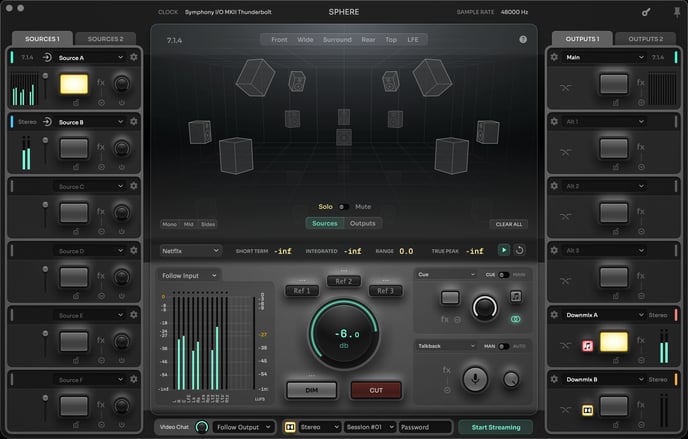
Here we see Sphere with audio going through it from Pro Tools (Its inputs) to the Symphony I/O MkII (Its Outputs). The center section is where the action is - Volume, Mutes, Solos, Dim, etc.
Here we see the Bass Management module. It's not just Bass Management though, this is also where you can adjust speaker delays and put a VST plugin on each of the speaker channels for room correction purposes.
What is Bass Management?
Bass management is the process of redirecting low-frequency content (typically below 80 Hz) from satellite channels to one or more subwoofers. The idea is that some (ceiling speakers for example) or all of the speakers in an Immersive setup might not be able to reproduce frequencies below 80Hz accurately. The redirection happens by way of a crossover that essentially splits the audio into two signals - one signal that goes to the (satellite) speaker and one signal that goes to the subwoofer. The crossover is comprised of a High Pass Filter that passes audio to the satellite speaker and a Low Pass Filter that passes audio to the subwoofer.

The Crossover takes the LowPass signal from each channel and passes it along to a summing circuit (∑) that adjusts for volume and sends it along to the Subwoofer.
This illustrates Bass Management, using a spectral display of audio going to a speaker and audio going to a subwoofer. This really explains it visually and is best viewed in fullscreen - that little square in the lower right hand corner.
What about hearing this all in headphones?
Translating what you hear in a room full of speakers to a pair of headphones is called Binaural Rendering. It's what you hear when you listen (in headphones) to Spatial Audio in Apple Music, Tidal, or Amazon Music. Sphere provides a way to preview what your immersive mix will sound like in headphones, and it offers it two flavors - Dolby Atmos binaural rendering and Apple Spatial binaural rendering.
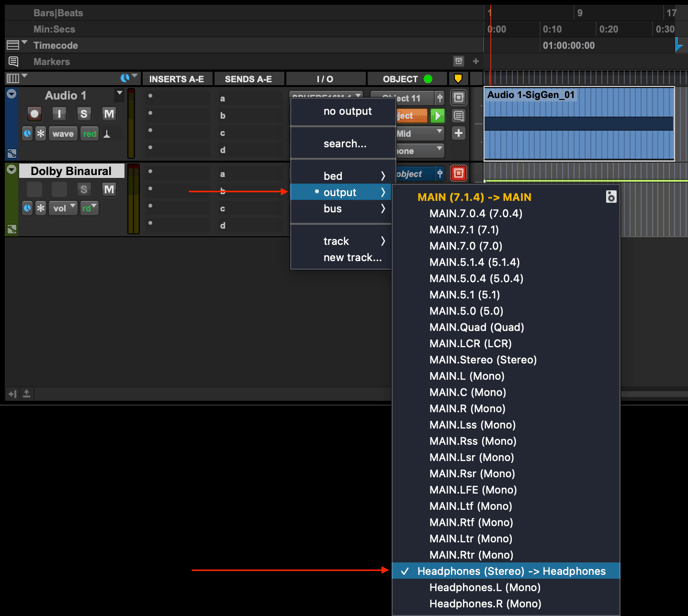
First we need to create an Aux Input track to properly route the Dolby binaural renderer. Command ⌘ + Shift ⇧ + N opens the new track dialog box. Choose Stereo, Aux Input and name it Dolby Binaural.

From the Input dropdown menu of the new Aux Track select re-renders> Headphones (binaural)
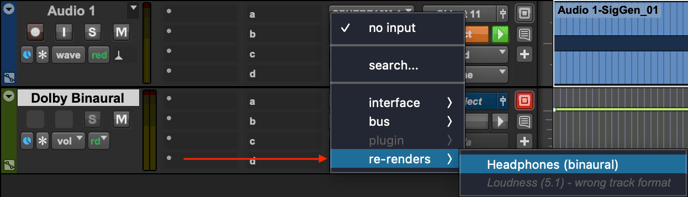
From the Output dropdown menu of the Aux Track select Output> Headphones. This is the output pair (13-14) we created earlier in the I/O setup.
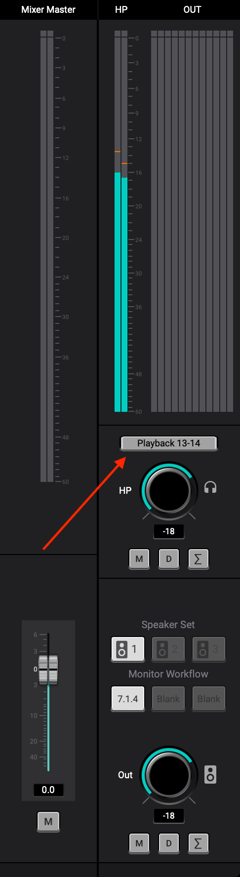
Back in Control 2, set the the source for your headphones to Playback 13 - 14.
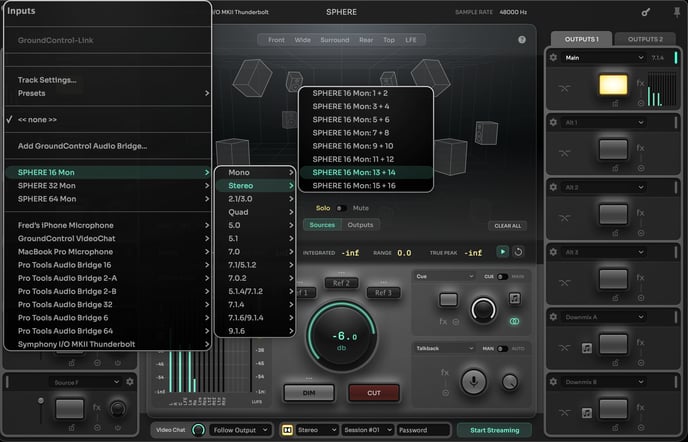
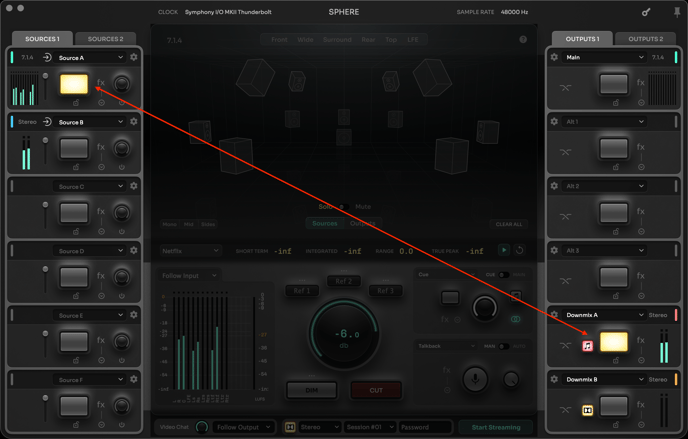
In Sphere, from the Source B dropdown...
Select SPHERE 16 Mon> Stereo> SPHERE 16 Mon 13 + 14. This is the output from the Dolby Binaural Aux Track from earlier.
Then from the Downmix A dropdown...
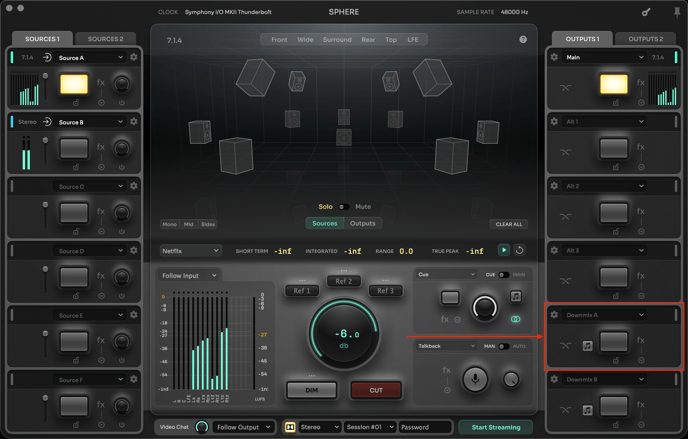
Select Symphony I/O MkII> Stereo> Outputs 13 + 14
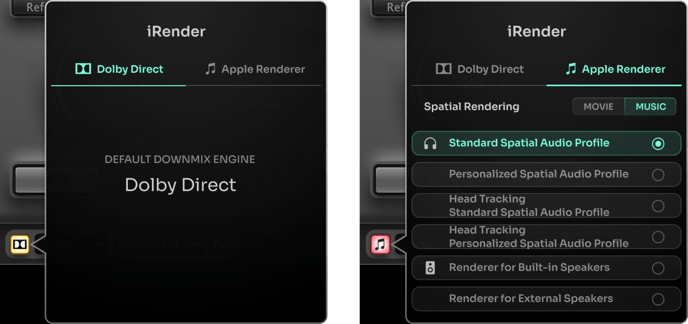
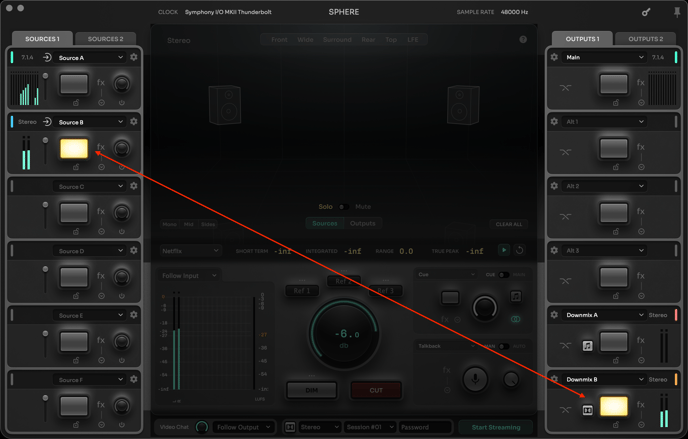
You will now see something like this. In Downmix A a renderer (the little lit up button) is turned on automatically. You may see the Apple one or the Dolby one.
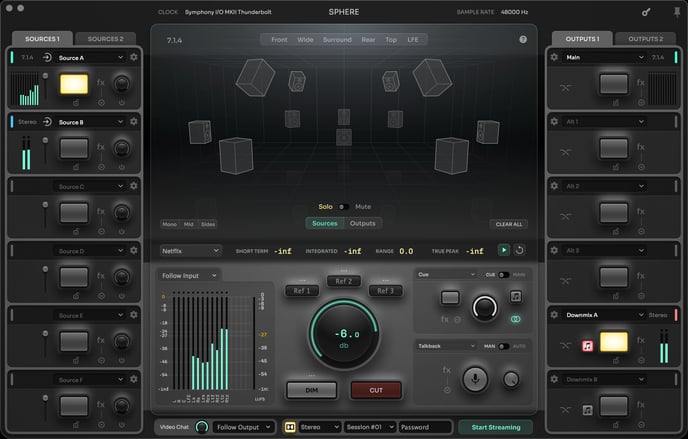
We want the Apple one on Downmix A. To change it, just click on it.
Now, from the Downmix B dropdown, select the same outputs as above, Symphony I/O MkII> Stereo> 13 + 14, and you will finally have this.
To hear the Apple Spatial Renderer select Source A & Downmix A.
To Hear the Dolby Atmos Binaural Renderer, select Source B & Downmix B. Don't be concerned about the Dolby "Light" not being on, this is a quirk of this workflow.
For more information visit Ginger Audio: https://www.gingeraudio.com/sphere-immersive-monitor-controller